Mounting Linux Mint Home Directory on Different Drive
by Sam
I recently mounted my Linux Mint home directory on a different internal hard drive to the operating system. Why did I do this? I wanted the operating system to run on a solid state drive to allow my computer to boot and run as quickly as possible, without limiting the amount of space I have to store files (as SSDs are expensive and typically measured in GB not TB).
I didn’t want to have to go to a special /mnt or other directory to access my files – I wanted it to be as seamless as possible. So moving everything under /home to a separate drive was desirable.
The end result is that I have a 240GB Kingston HyperX Solid State Drive running Linux Mint 18.3 ‘Sylvia’ Cinnamon. All of my personal files (Desktop, Documents, Photos, Music etc.) reside on a 2TB Seagate Firecuda Hybrid Drive. (I chose a Hybrid as it’s faster than a HDD but cheaper, higher capacity and more reliable than a SSD).
This gives me the following benefits:
- Best compromise between enough storage space and fast responsive operating system
- If I need to upgrade the operating system, I don’t need to worry about my personal files being wiped
- I can easily upgrade the size of my personal storage space without touching the operating system
I performed this on Linux Mint, although this should be equally valid for Ubuntu without modification. If using another Linux distro, then you may need to tweak some of the steps.
The steps below should be fairly failsafe. We are not deleting or wiping anything – merely copying and relocating. However, it is possible to mess up the mounting so that you can’t log in. I have included some steps to take should anything go wrong.
Step 1
Back everything up. Just in case. If you have just performed a fresh installation, then you obviously don’t need to worry about this.
Step 2
If it isn’t already connected, physically install your second hard drive.
Step 3
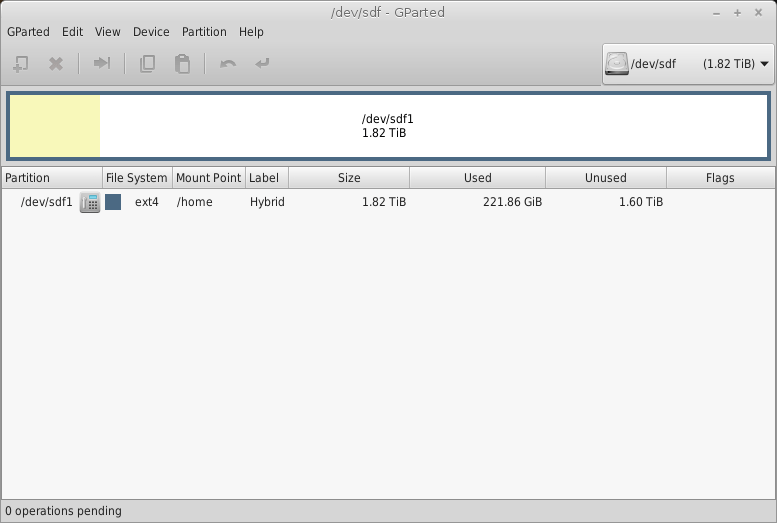
Format your new drive. I used the gparted program to create a ‘gpt’ partition table (Select Device -> Create Partition Table) and format it for an ‘ext4’ filesystem (select Partition -> New). Just make sure that you select the correct drive in the top-right of the screen (you can use the volume size as a guide).
Warning: If you select the wrong drive then you’ll end up wiping your data and operating system (but you did take a backup, right?)
Step 4
Create a temporary directory for your new home drive:
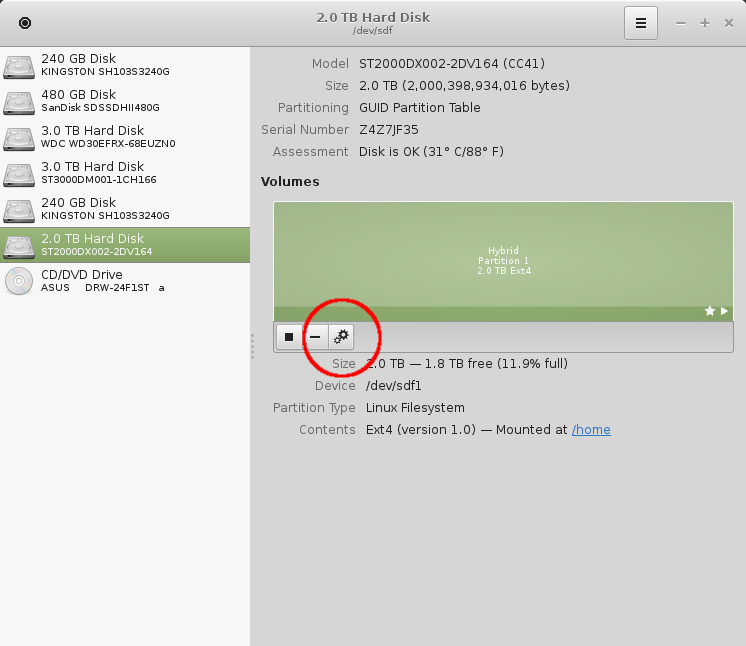
sudo mkdir /mnt/new_homeThen mount your drive. You can do this as a one-off via a sudo mount… command, or edit the /etc/fstab file. I prefer the latter, albeit via the gnome-disk-utility program (aka ‘Disks’ in Linux Mint). Open Disks, select your new drive and click the settings (cogs) icon:
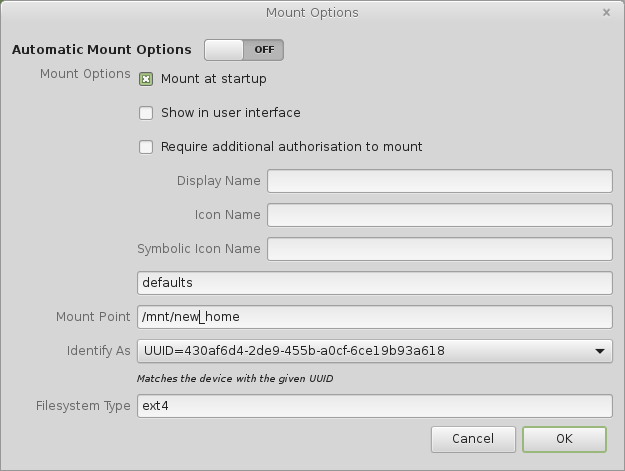
Then select Edit Mount Options. Set the options as below:
Select OK then hit the Play button to mount the drive
Step 5
Copy all of your files to the new drive. If successful, then your /mnt/new_home directory will look identical to your /home directory. I moved each user individually, so that I could check everything was progressing ok without waiting until the end of the copy (which can take a long time if you have a lot of files).
cp -axv /home/user_name /mnt/new_home #replacing user_name with the name of the user you want to copy.You could also move all users in one go via:
cp -axv /home/* /mnt/new_homeThe flags used here are:
- -a: Archive mode, recursively copies, preserving permissions etc. Without this, your copied files will all belong to the root user.
- -x: Ensures that the copy does not follow symbolic links to others hard drives. May not be needed in your case, but not a bad shout to include it anyway
- -v: Verbose, displaying what is being copied. I like to see progress so that I know the copy is still working
Note that the user permissions will be applied at the end of the copy, so don’t worry if you see all of your files initially belonging to root.
Step 6
Once you are happy that everything has copied successfully, we will swap out the home directory with the new one. First we’ll rename the home directory:
sudo mv /home /home_oldThen we will create a folder for the new drive to mount to:
sudo mkdir /homeAnd finally mount the drive. Go back to the Disks program and change the mount point from /mnt/new_home to /home. Then mount it (hit the play button). If happy that all looks ok, restart the computer and hopefully everything just works!
Step 7
Check your files all look ok. Do this for each user. If happy, you can remove the old home directory:
sudo rm -rf /home_oldIf all fails If something has gone wrong, then don’t panic. You still have three copies of your data:
- Your external backup (you did back everything up, didn’t you?)
- Your original home direcory (that we renamed to /home_old
- Your copy of /home that we’re trying to mount.
If the worst comes to the worst, then wipe your computer and regenerate your files from your backup. However, it shouldn’t come to that.
If you can log in, then check that you have set up the mounting correctly. Retrace the steps above to make sure that you haven’t missed anything.
If you can’t log in, then hold down Ctrl+Alt+F1 to open a terminal and log in with your username and password. Edit the File System Table file:
sudo nano /etc/fstabThis file will look something like this:
# /etc/fstab: static file system information.
#
# Use 'blkid' to print the universally unique identifier for a
# device; this may be used with UUID= as a more robust way to name devices
# that works even if disks are added and removed. See fstab(5).
#
# <file system> <mount point>   <type>  <options>       <dump>  <pass>
# / was on /dev/sda2 during installation
UUID=4bcb0546-271c-4366-b294-9aa603dd4b72 /               ext4    errors=remount-ro 0       1
# /boot/efi was on /dev/sda1 during installation
UUID=4947-4AB8  /boot/efi       vfat    umask=0077      0       1
# swap was on /dev/sda3 during installation
UUID=884d6349-f03f-46a4-854e-d5af5d961f2c none            swap    sw              0       0
UUID=88e85a4f-2421-4399-933b-930ea08c39e3 /home ext4 defaults 0 0
This shows the hard drives (identified by their UUID) followed by their mount points. Check that they are set correctly. If you see a problem, then edit the file, save and restart. You can restart with sudo reboot.
If you can’t figure out what has gone wrong, then you can always put your old home directory back where it was. Comment out the line that mounts your new drive by preceding it with a hash # and saving (your new drive will be the one mounting to /home. Then unmount the drive sudo umount /home (or reboot if this doesn’t work, such as if the device is busy). You can then remove the home directory mount folder sudo rmdir /home and move your old home directory back to it’s original location sudo mv /home_old /home then restart.
Hopefully it won’t come to that and everything will just work, but it’s always good to have a Plan B (and C and D…)
Subscribe via RSS


